# Manage applications
This topic provides information about managing applications, including how to create, delete, and retrieve the slug for applications in the Replicated Vendor Portal and with the Replicated CLI.
For information about creating and managing application with the Vendor API v3, see the [apps](https://replicated-vendor-api.readme.io/reference/createapp) section in the Vendor API v3 documentation.
## Create an application
Teams can create one or more applications. It is common to create multiple applications for testing purposes.
### Vendor Portal
To create a new application:
1. Log in to the [Vendor Portal](https://vendor.replicated.com/). If you do not have an account, see [Create a Vendor Account](/vendor/vendor-portal-creating-account).
1. In the top left of the page, open the application drop down and click **Create new app...**.
 [View a larger version of this image](/images/create-new-app.png)
1. On the **Create application** page, enter a name for the application.
[View a larger version of this image](/images/create-new-app.png)
1. On the **Create application** page, enter a name for the application.
 [View a larger version of this image](/images/create-application-page.png)
:::important
If you intend to use the application for testing purposes, Replicated recommends that you use a temporary name such as `My Application Demo` or `My Application Test`.
You are not able to restore or modify previously-used application names or application slugs.
:::
1. Click **Create application**.
### Replicated CLI
To create an application with the Replicated CLI:
1. Install the Replicated CLI. See [Install the Replicated CLI](/reference/replicated-cli-installing).
1. Run the following command:
```bash
replicated app create APP-NAME
```
Replace `APP-NAME` with the name that you want to use for the new application.
**Example**:
```bash
replicated app create cli-app
ID NAME SLUG SCHEDULER
1xy9t8G9CO0PRGzTwSwWFkMUjZO cli-app cli-app kots
```
## Get the application slug {#slug}
Each application has a slug, which is used for interacting with the application using the Replicated CLI. The slug is automatically generated based on the application name and cannot be changed.
### Vendor Portal
To get an application slug in the Vendor Portal:
1. Log in to the [Vendor Portal](https://vendor.replicated.com/) and go to **_Application Name_ > Settings**.
1. Under **Application Slug**, copy the slug.
[View a larger version of this image](/images/create-application-page.png)
:::important
If you intend to use the application for testing purposes, Replicated recommends that you use a temporary name such as `My Application Demo` or `My Application Test`.
You are not able to restore or modify previously-used application names or application slugs.
:::
1. Click **Create application**.
### Replicated CLI
To create an application with the Replicated CLI:
1. Install the Replicated CLI. See [Install the Replicated CLI](/reference/replicated-cli-installing).
1. Run the following command:
```bash
replicated app create APP-NAME
```
Replace `APP-NAME` with the name that you want to use for the new application.
**Example**:
```bash
replicated app create cli-app
ID NAME SLUG SCHEDULER
1xy9t8G9CO0PRGzTwSwWFkMUjZO cli-app cli-app kots
```
## Get the application slug {#slug}
Each application has a slug, which is used for interacting with the application using the Replicated CLI. The slug is automatically generated based on the application name and cannot be changed.
### Vendor Portal
To get an application slug in the Vendor Portal:
1. Log in to the [Vendor Portal](https://vendor.replicated.com/) and go to **_Application Name_ > Settings**.
1. Under **Application Slug**, copy the slug.
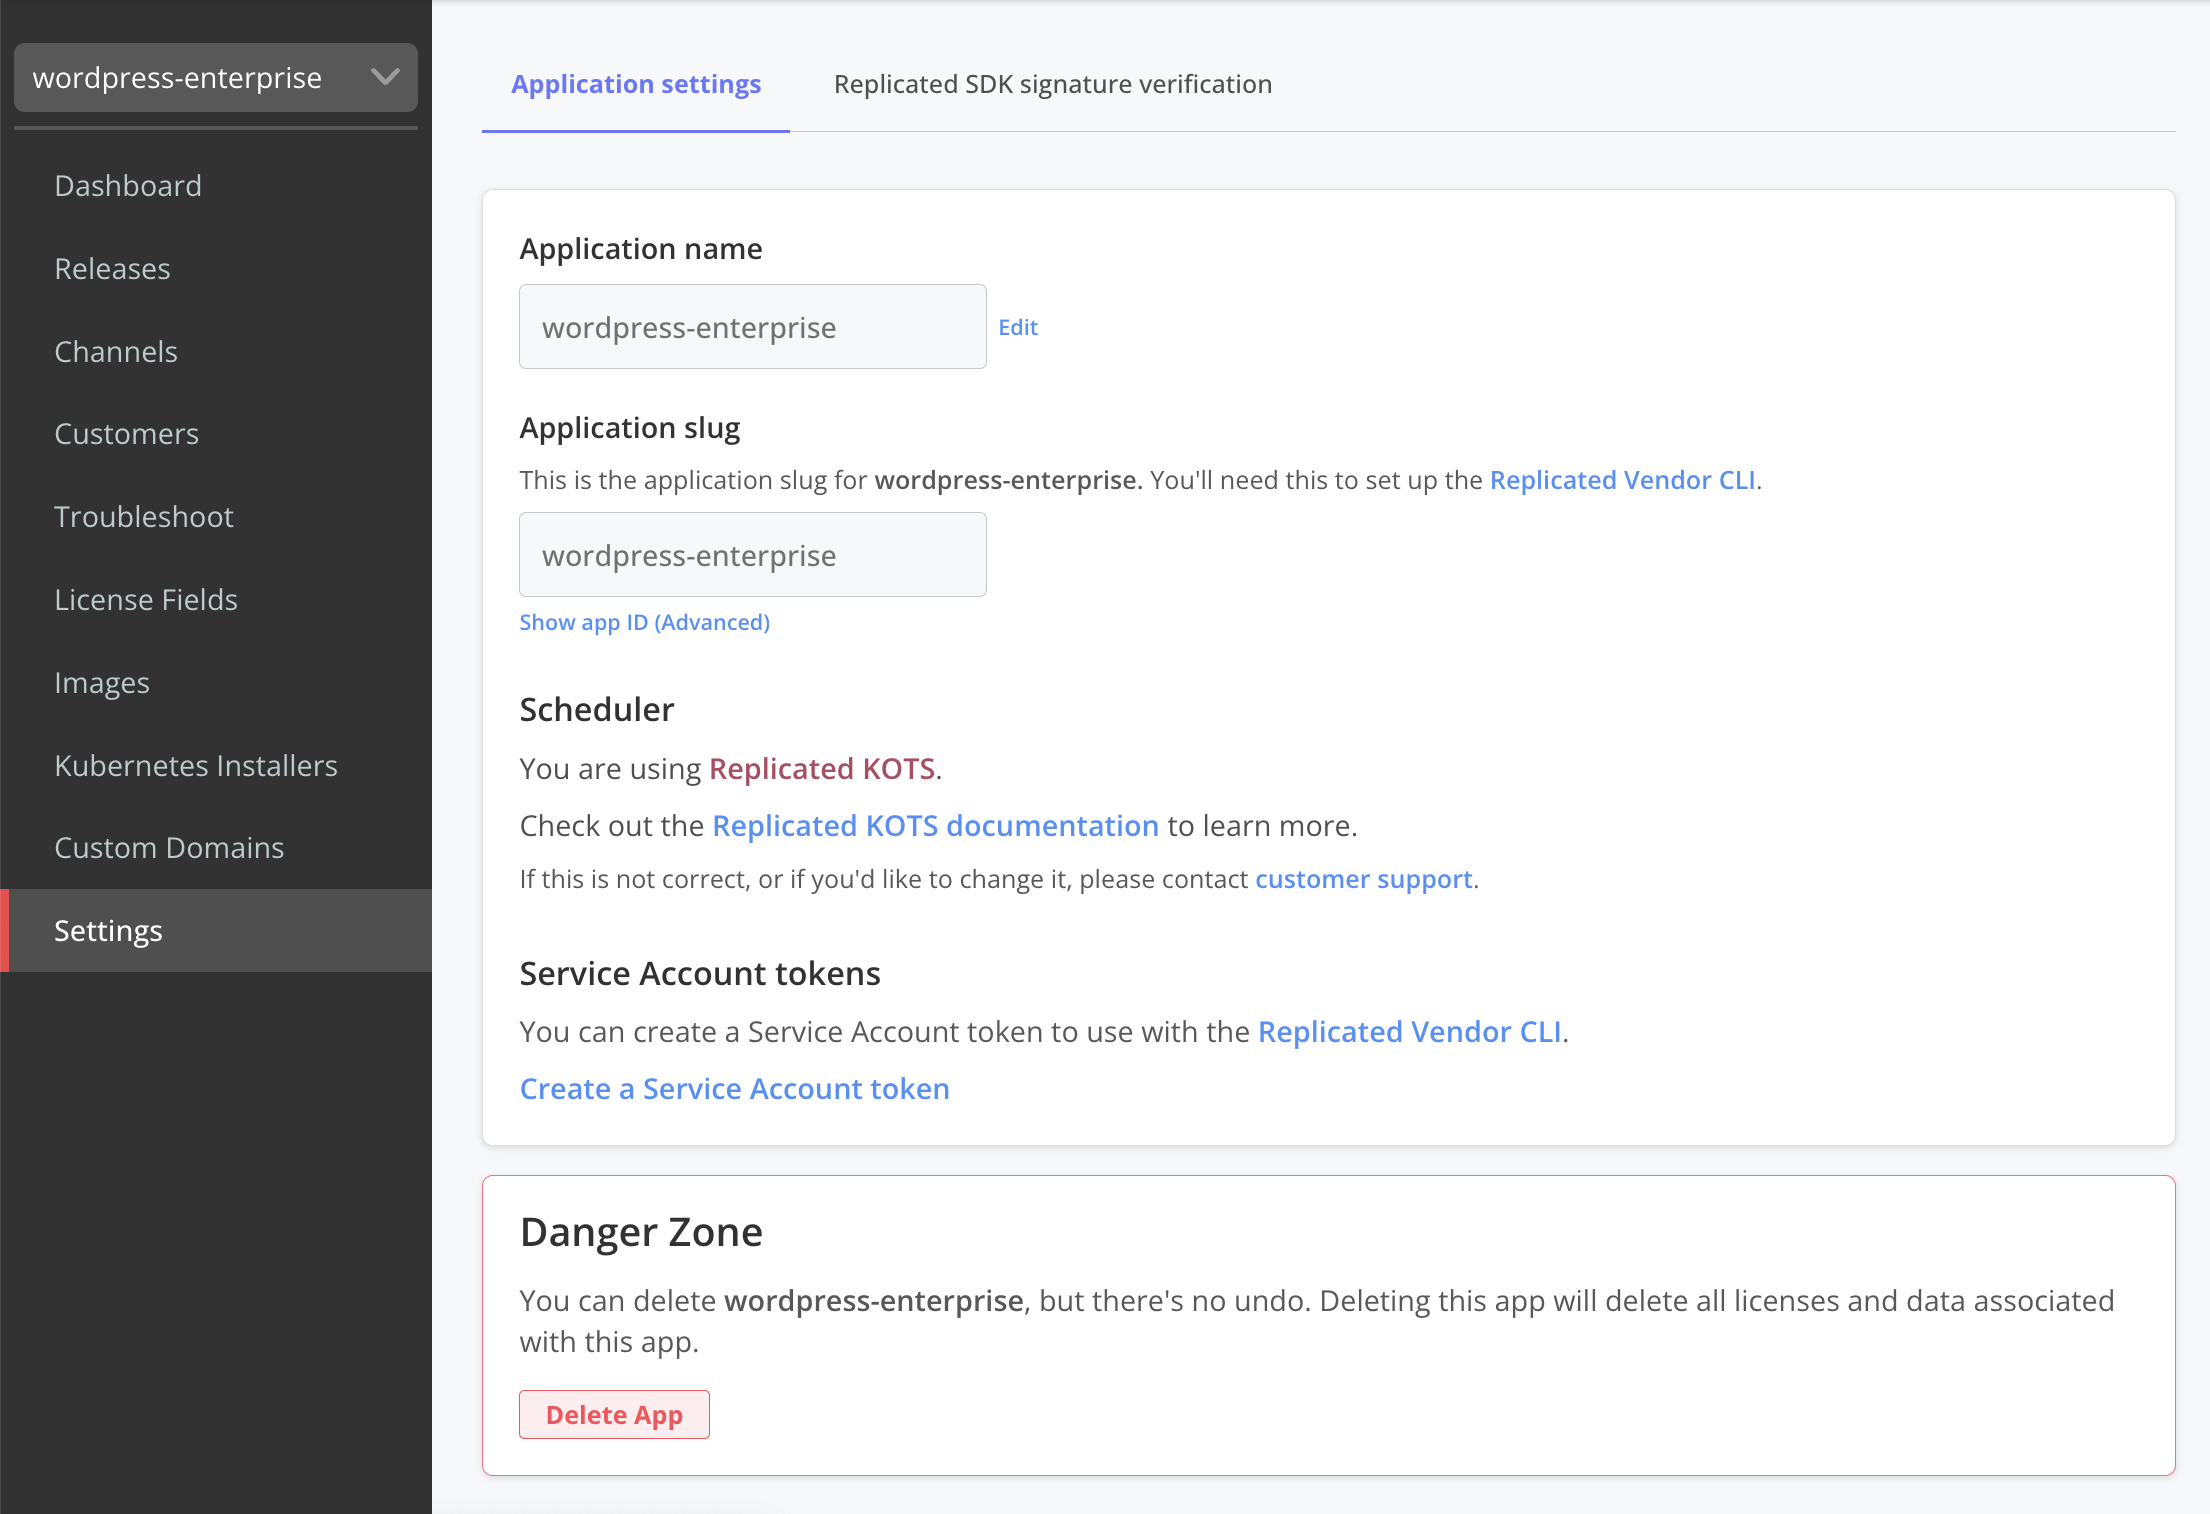 [View a larger version of this image](/images/application-settings.png)
### Replicated CLI
To get an application slug with the Replicated CLI:
1. Install the Replicated CLI. See [Install the Replicated CLI](/reference/replicated-cli-installing).
1. Run the following command:
```bash
replicated app ls APP-NAME
```
Replace `APP-NAME` with the name of the target application. Or, exclude `APP-NAME` to list all applications in the team.
**Example:**
```bash
replicated app ls cli-app
ID NAME SLUG SCHEDULER
1xy9t8G9CO0PRGzTwSwWFkMUjZO cli-app cli-app kots
```
1. Copy the value in the `SLUG` field.
## Set a default application
Teams with multiple applications can set a default application. This ensures that all team members land on the correct application when they first log in. Without a default, the Vendor Portal selects whichever application comes first alphabetically.
To set a default application:
1. From the [Team Members](https://vendor.replicated.com/team/members) page, click **Team Settings**.
1. Select an application from the **Default application** dropdown.
1. Click **Save changes**.
To clear the default, click **Clear default** on the **Team Settings** page.
## Delete an application
When you delete an application, you also delete all licenses and data associated with the application. You can also optionally delete all images associated with the application from the Replicated registry. Deleting an application cannot be undone.
### Vendor Portal
To delete an application in the Vendor Portal:
1. Log in to the [Vendor Portal](https://vendor.replicated.com/) and go to **_Application Name_ > Settings**.
1. Under **Danger Zone**, click **Delete App**.
[View a larger version of this image](/images/application-settings.png)
1. In the **Are you sure you want to delete this app?** dialog, enter the application name. Optionally, enter your password if you want to delete all images associated with the application from the Replicated registry.
[View a larger version of this image](/images/application-settings.png)
### Replicated CLI
To get an application slug with the Replicated CLI:
1. Install the Replicated CLI. See [Install the Replicated CLI](/reference/replicated-cli-installing).
1. Run the following command:
```bash
replicated app ls APP-NAME
```
Replace `APP-NAME` with the name of the target application. Or, exclude `APP-NAME` to list all applications in the team.
**Example:**
```bash
replicated app ls cli-app
ID NAME SLUG SCHEDULER
1xy9t8G9CO0PRGzTwSwWFkMUjZO cli-app cli-app kots
```
1. Copy the value in the `SLUG` field.
## Set a default application
Teams with multiple applications can set a default application. This ensures that all team members land on the correct application when they first log in. Without a default, the Vendor Portal selects whichever application comes first alphabetically.
To set a default application:
1. From the [Team Members](https://vendor.replicated.com/team/members) page, click **Team Settings**.
1. Select an application from the **Default application** dropdown.
1. Click **Save changes**.
To clear the default, click **Clear default** on the **Team Settings** page.
## Delete an application
When you delete an application, you also delete all licenses and data associated with the application. You can also optionally delete all images associated with the application from the Replicated registry. Deleting an application cannot be undone.
### Vendor Portal
To delete an application in the Vendor Portal:
1. Log in to the [Vendor Portal](https://vendor.replicated.com/) and go to **_Application Name_ > Settings**.
1. Under **Danger Zone**, click **Delete App**.
[View a larger version of this image](/images/application-settings.png)
1. In the **Are you sure you want to delete this app?** dialog, enter the application name. Optionally, enter your password if you want to delete all images associated with the application from the Replicated registry.
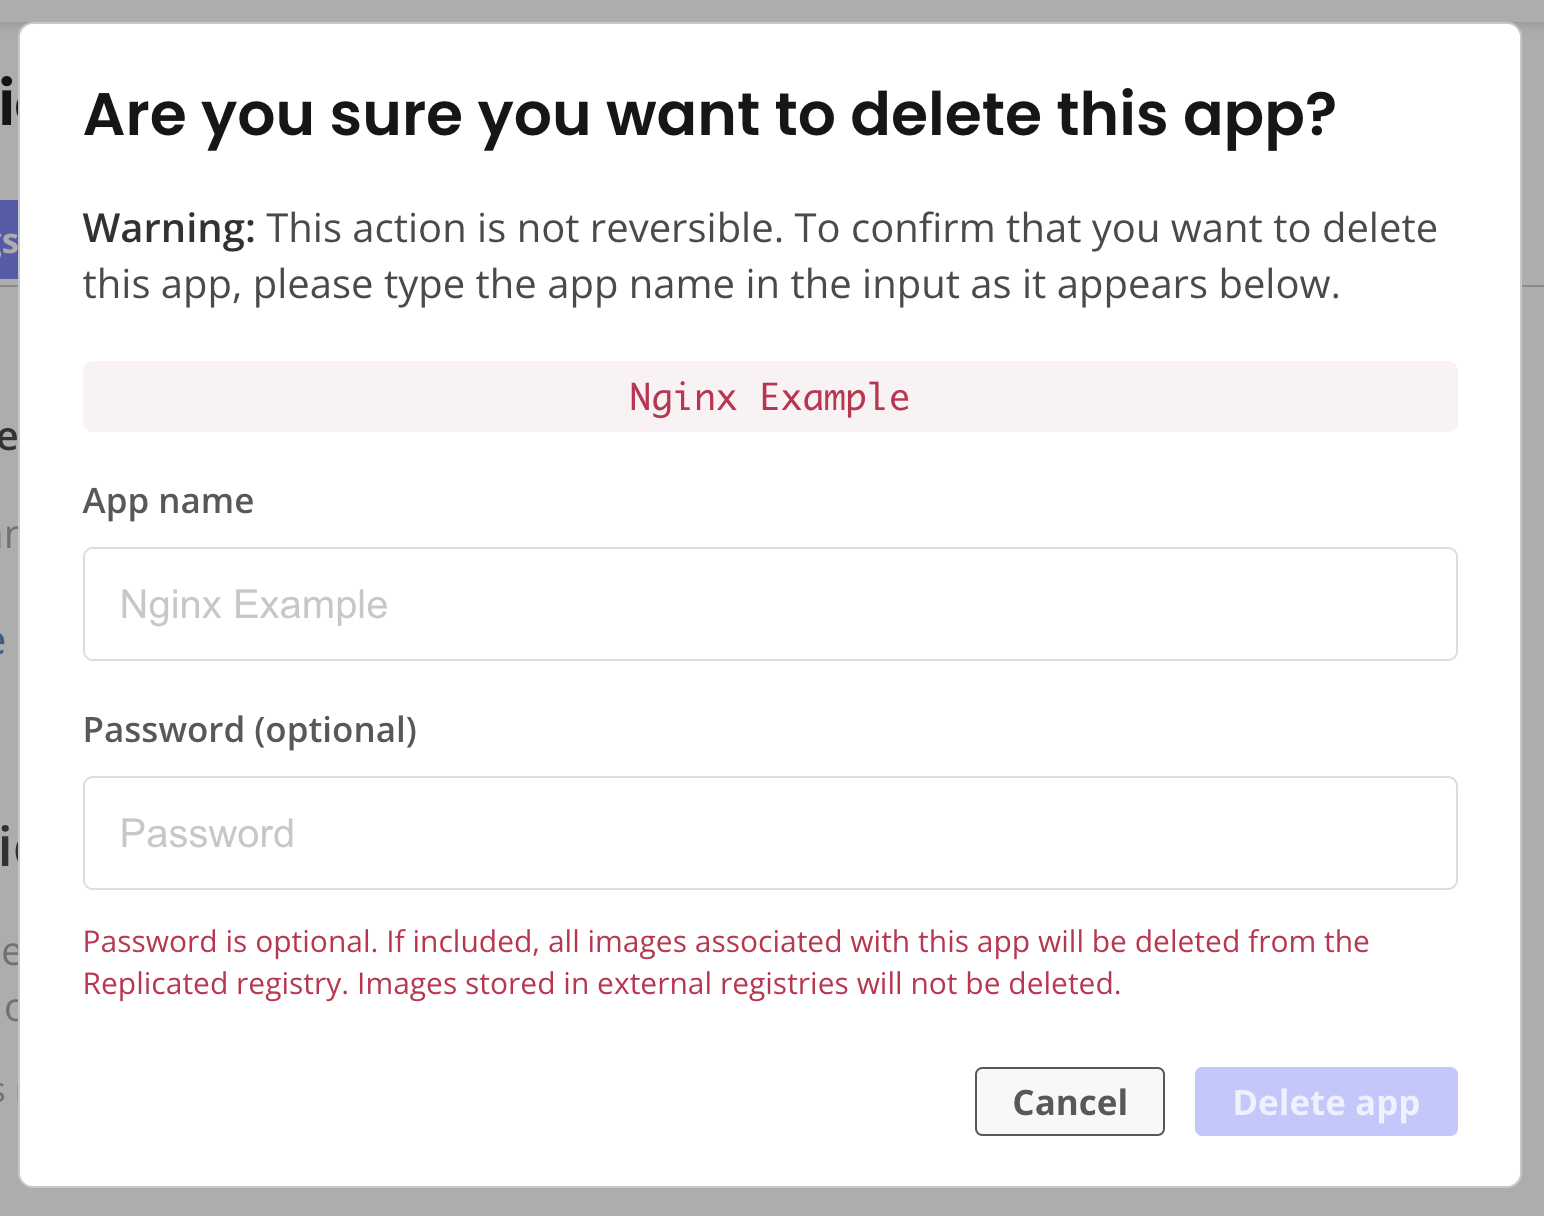 [View a larger version of this image](/images/delete-app-dialog.png)
1. Click **Delete app**.
### Replicated CLI
To delete an application with the Replicated CLI:
1. Install the Replicated CLI. See [Install the Replicated CLI](/reference/replicated-cli-installing).
1. Run the following command:
```bash
replicated app delete APP-NAME
```
Replace `APP-NAME` with the name of the target application.
1. When prompted, type `yes` to confirm that you want to delete the application.
**Example:**
```bash
replicated app delete deletion-example
• Fetching App ✓
ID NAME SLUG SCHEDULER
1xyAIzrmbvq... deletion-example deletion-example kots
Delete the above listed application? There is no undo: yes█
• Deleting App ✓
```
[View a larger version of this image](/images/delete-app-dialog.png)
1. Click **Delete app**.
### Replicated CLI
To delete an application with the Replicated CLI:
1. Install the Replicated CLI. See [Install the Replicated CLI](/reference/replicated-cli-installing).
1. Run the following command:
```bash
replicated app delete APP-NAME
```
Replace `APP-NAME` with the name of the target application.
1. When prompted, type `yes` to confirm that you want to delete the application.
**Example:**
```bash
replicated app delete deletion-example
• Fetching App ✓
ID NAME SLUG SCHEDULER
1xyAIzrmbvq... deletion-example deletion-example kots
Delete the above listed application? There is no undo: yes█
• Deleting App ✓
```