The HelmChart custom resource provides instructions to the installer about how to deploy the Helm chart. The name and chartVersion listed in the HelmChart custom resource must match the name and version of a Helm chart archive in the release. This HelmChart resource includes several `values` and conditional `optionalValues` that are supplied to `helm template` during deployment.
The Replicated Application custom resource enables features in the Replicated Admin Console UI, which is used to configure, install, update, and manage applications. This Application resource provides a name for the application to display in the Admin Console, adds custom status informers that are used to display the status of the deployment in the Admin Console dashboard, and adds a custom application icon.
The Kubernetes SIG Application custom resource supports functionality such as including buttons and links on the Admin Console dashboard. This SIG Application resource adds an Open SlackerNews button that opens the application.
To install your application with Embedded Cluster, an Embedded Cluster Config must be present in the release. At minimum, the Embedded Cluster Config sets the version of Embedded Cluster that will be installed. You can also define several characteristics about the cluster.
The Config custom resource defines the application configuration fields that are exposed to the user in the Admin Console. These fields can then be mapped to the `values.yaml` file for the Helm chart. This Config resource includes several fields, but you will only use a few of them when installing SlackerNews for the purpose of this tutorial.
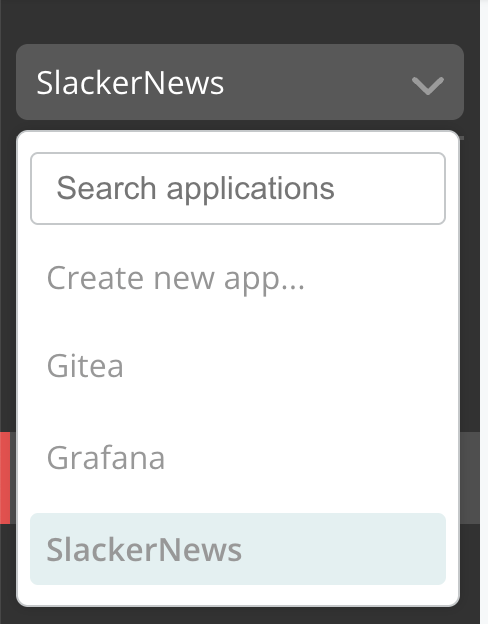 [View a larger version of this image](/images/quick-start-app-dropdown-slackernews.png)
1. Click **Customers > Create customer**.
On the **Create a new customer** page:
1. For **Customer name**, enter a name for the customer. For example, `Example Customer`.
1. For **Assigned Channel**, select **Unstable**. This allows the customer to install releases promoted to the Unstable channel.
1. For **Customer type**, select **Development**.
1. For **Install types**, enable **Embedded Cluster (current generation product)** and disable the other install type options.
1. Click **Save Changes**.
1. (Optional) In the Vendor Portal, click **Releases** to view the release that you promoted. In the release viewer, you can see the Replicated manifests as well as the SlackerNews `Chart.yaml` and `values.yaml` files.
1. If you brought your own VM, SSH onto your VM. Otherwise, follow these steps to create and SSH onto a VM with CMX:
1. Create an Ubuntu VM that expires after two hours:
```bash
replicated vm create --distribution ubuntu --version 24.04 --instance-type r1.small --disk 50 --ttl 2h
```
**Example output:**
```bash
ID NAME DISTRIBUTION VERSION STATUS NETWORK CREATED EXPIRES COST
97940819 practical_black ubuntu 24.04 queued c726ffff 2025-08-20 14:32 MDT - $0.69
```
1. After a few minutes, check the status of the VM to see when it is `running`:
```bash
replicated vm ls
```
**Example output:**
```bash
ID NAME DISTRIBUTION VERSION STATUS NETWORK CREATED EXPIRES COST
97940819 practical_black ubuntu 24.04 running c726ffff 2025-08-20 14:32 MDT 2025-08-20 16:33 MDT $0.69
```
1. Run the following command to use the CMX Forwarder to SSH onto the VM:
```bash
ssh VM_ID@replicatedvm.com
```
Where `VM_ID` is the `ID` from the output of the `replicated vm ls` command.
:::note
If you are prompted to add the fingerprint for replicatedvm.com, type `yes` and press Enter.
:::
1. When prompted, provide the passphrase for the SSH key in your linked GitHub account. CMX uses GitHub SSH to provide access to the VM.
1. Install the application with Embedded Cluster:
1. In the Vendor Portal, on the page for the customer that you created, click **Embedded Cluster install instructions**.

[View a larger version of this image](/images/quick-start-slackernews-customer-install-instructions-button.png)
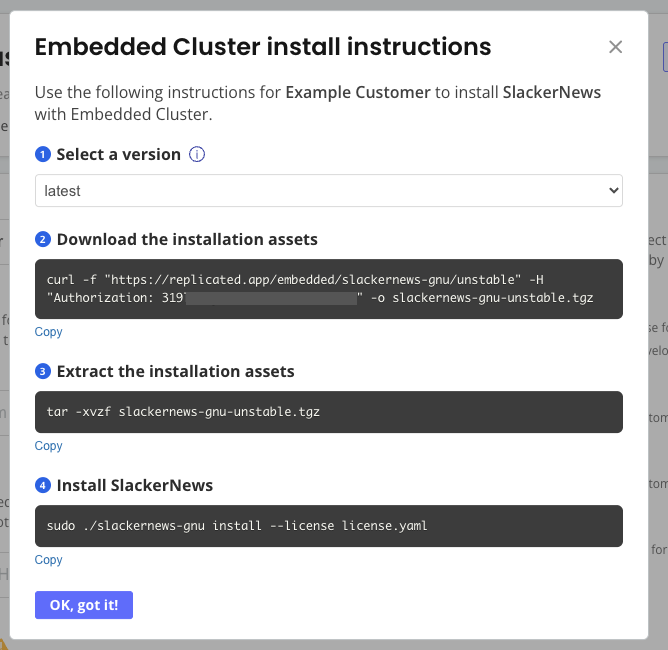
1. On your VM, run the commands in the **Embedded cluster install instructions** dialog to download the latest release, extract the installation assets, and install SlackerNews.
[View a larger version of this image](/images/quick-start-app-dropdown-slackernews.png)
1. Click **Customers > Create customer**.
On the **Create a new customer** page:
1. For **Customer name**, enter a name for the customer. For example, `Example Customer`.
1. For **Assigned Channel**, select **Unstable**. This allows the customer to install releases promoted to the Unstable channel.
1. For **Customer type**, select **Development**.
1. For **Install types**, enable **Embedded Cluster (current generation product)** and disable the other install type options.
1. Click **Save Changes**.
1. (Optional) In the Vendor Portal, click **Releases** to view the release that you promoted. In the release viewer, you can see the Replicated manifests as well as the SlackerNews `Chart.yaml` and `values.yaml` files.
1. If you brought your own VM, SSH onto your VM. Otherwise, follow these steps to create and SSH onto a VM with CMX:
1. Create an Ubuntu VM that expires after two hours:
```bash
replicated vm create --distribution ubuntu --version 24.04 --instance-type r1.small --disk 50 --ttl 2h
```
**Example output:**
```bash
ID NAME DISTRIBUTION VERSION STATUS NETWORK CREATED EXPIRES COST
97940819 practical_black ubuntu 24.04 queued c726ffff 2025-08-20 14:32 MDT - $0.69
```
1. After a few minutes, check the status of the VM to see when it is `running`:
```bash
replicated vm ls
```
**Example output:**
```bash
ID NAME DISTRIBUTION VERSION STATUS NETWORK CREATED EXPIRES COST
97940819 practical_black ubuntu 24.04 running c726ffff 2025-08-20 14:32 MDT 2025-08-20 16:33 MDT $0.69
```
1. Run the following command to use the CMX Forwarder to SSH onto the VM:
```bash
ssh VM_ID@replicatedvm.com
```
Where `VM_ID` is the `ID` from the output of the `replicated vm ls` command.
:::note
If you are prompted to add the fingerprint for replicatedvm.com, type `yes` and press Enter.
:::
1. When prompted, provide the passphrase for the SSH key in your linked GitHub account. CMX uses GitHub SSH to provide access to the VM.
1. Install the application with Embedded Cluster:
1. In the Vendor Portal, on the page for the customer that you created, click **Embedded Cluster install instructions**.

[View a larger version of this image](/images/quick-start-slackernews-customer-install-instructions-button.png)
1. On your VM, run the commands in the **Embedded cluster install instructions** dialog to download the latest release, extract the installation assets, and install SlackerNews.
 [View a larger version of this image](/images/embedded-cluster-install-dialog-latest.png)
1. When prompted by the `install` command, set a password for accessing the Admin Console.
:::note
Remember this password because you will use it to log in to the Admin Console in a later step.
:::
The installation command takes a few minutes to complete.
**Example output:**
```bash
? Set the Admin Console password (minimum 6 characters): ********
? Confirm the Admin Console password: ********
✔ Initialization complete
✔ Host preflights passed
✔ Node is ready
✔ Storage is ready
✔ Runtime Operator is ready
✔ Admin Console is ready
✔ Additional components are ready
-----------------------------------------------------------------
Visit the Admin Console to configure and install slackernews-gnu:
http://10.0.0.11:30000
-----------------------------------------------------------------
```
At this point, the cluster is provisioned and the Admin Console is deployed, but the application is not yet installed.
1. Do one of the following to access the Admin Console:
* If you brought your own VM, go to the URL provided in the output of the install command.
:::note
The IP address in the provided URL might be the private IP address of your VM. You might need to edit the URL to use the public IP address.
:::
* If you created the VM with CMX:
1. In the Vendor Portal, go to [**Compatibility Matrix**](https://vendor.replicated.com/compatibility-matrix/overview).
1. Open the dot menu for your VM and click **Edit VM**.

[View a larger version of this image](/images/compatibility-matrix-edit-vm.png)
1. Under **Ingress & Ports**, for **Add DNS record**, click **Add** to create a DNS record using the default settings. This will provide a hostname where you can access the Admin Console.
1. Add another DNS record with a **Target Port** of **443**. This will provide a hostname where you can access SlackerNews after it's installed.
The following shows an example of both of these DNS records added to a VM:

[View a larger version of this image](/images/compatibility-matrix-dns-record.png)
1. (Optional) Copy the URL for the DNS record with a target port of 443 and save it somewhere on your local machine. You will be asked to provide this hostname in the Admin Console as part of the installation process for SlackerNews.
1. In a browser, navigate to the URL for the DNS record with a target port of 30000.
The Admin Console opens.
1. If you are directed to the Admin Console landing page:
1. Click **Start**.
1. On the **Secure the Admin Console** screen, review the instructions and click **Continue**. In your browser, follow the instructions that were provided on the **Secure the Admin Console** screen to bypass the warning.
1. On the **Certificate type** screen, either select **Self-signed** to continue using the self-signed Admin Console certificate or click **Upload your own** to upload your own private key and certificate. By default, a self-signed TLS certificate is used to secure communication between your browser and the Admin Console. You will see a warning in your browser every time you access the Admin Console unless you upload your own certificate.
:::note
If you created the VM with CMX, you might not see these pages. Instead, your browser might automatically redirect to the Admin Console login screen.
:::
1. On the login screen, enter the Admin Console password that you set and click **Log in**.

[View a larger version of this image](/images/quick-start-slackernews-admin-console-login.png)
1. On the **Configure the cluster** screen, you can view details about the VM where you installed, including its node role, status, CPU, and memory. Users can also optionally add additional nodes on this page before deploying the application. Click **Continue**.

[View a larger version of this image](/images/quick-start-slackernews-configure-the-cluster.png)
1. On the **Configure SlackerNews** screen, complete the following fields:
* For **Ingress Hostname**:
* If you created the VM with CMX, enter the URL that you copied for the DNS record with a target port of 443. For example, `pensive-keldysh.ingress.replicatedcluster.com`.
* If you are using your own VM, provide the public IP address for your VM. You can copy the IP address from your browser's address bar where you are currently accessing the Admin Console. Alternatively, if you have a hostname for your VM's IP address, you can provide that instead.
* For **Application Access > Service Type**, ensure that **NodePort** is selected. Leave the **Node Port** field blank to use the default port of 443.
* For **Postgresql**, ensure that **Deploy Postgresql Database** is enabled to deploy the built-in Postgresql database.
Leave the other fields on the **Configure SlackerNews** screen empty. They are not applicable for this quick start.

[View a larger version of this image](/images/quick-start-slackernews-configure-slackernews.png)
1. Click **Continue**.
The Admin Console dashboard opens. The application status changes from Missing to Unavailable while the application is being deployed. You can click **Details** next to the status for more information about the status of specific application resources.
After a few minutes, the status changes to Ready when the application is deployed:

[View a larger version of this image](/images/quick-start-slackernews-adm-dashboard-ready.png)
1. After a few minutes when the application status is Ready, click **Open SlackerNews** to view SlackerNews in a browser.

[View a larger version of this image](/images/slackernews-landing-page.png)
1. View telemetry for the instance that you just deployed:
1. Return to the Vendor Portal, select the SlackerNews application, and go to **Customers**. Under the name of the customer, confirm that you can see an active instance.

[View a larger version of this image](/images/quick-start-slackernews-customer-instance.png)
This instance telemetry is automatically collected and sent back to the Vendor Portal by Embedded Cluster and the Replicated SDK. For more information, see [About Instance and Event Data](/vendor/instance-insights-event-data).
1. (Optional) Under **Instance ID**, click on the ID to view additional insights including the versions of Kubernetes and the Replicated SDK running in the cluster where you installed the application.
1. Create a new release that adds preflight checks to the application:
1. In your local filesystem, go to the `quick-start/chart/slackernews` directory.
1. Create a `preflights.yaml` file in the `templates` directory for the chart:
```
touch templates/preflights.yaml
```
1. In the `preflights.yaml` file, add the following YAML to create a Kubernetes Secret with a simple preflight spec:
```yaml
apiVersion: v1
kind: Secret
metadata:
name: slackernews-preflight
labels:
troubleshoot.sh/kind: preflight
stringData:
preflight.yaml: |-
apiVersion: troubleshoot.sh/v1beta2
kind: Preflight
metadata:
name: slackernews-preflight
spec:
collectors:
- clusterInfo: {}
- clusterResources: {}
- http:
collectorName: slack
get:
url: https://api.slack.com/methods/api.test
timeout: 20s
analyzers:
# verify that slack is accessible
- textAnalyze:
checkName: Slack Accessible
fileName: slack.json
regex: '"status": 200,'
outcomes:
- pass:
when: "true"
message: "Can access the Slack API"
- fail:
when: "false"
message: "Cannot access the Slack API. Check that the server can reach the internet and check [status.slack.com](https://status.slack.com)."
```
The YAML above defines a preflight check that confirms that an HTTP request to the Slack API at `https://api.slack.com/methods/api.test` made from the cluster returns a successful response of `"status": 200,`.
1. In the `Chart.yaml` file, increment the version to 1.0.1:
```yaml
# Chart.yaml
version: 1.0.1
```
1. Update dependencies and package the chart to a `.tgz` chart archive:
```bash
helm package --dependency-update .
```
1. Move the `slackernews-1.0.1.tgz` chart archive to the `manifests` directory:
```bash
mv slackernews-1.0.1.tgz ../../manifests
```
1. Change to the `manifests` directory.
1. In the `manifests` directory, open the HelmChart custom resource (`slackernews.yaml`) and update the `chartVersion` to match the new archive:
```yaml
# slackernews.yaml HelmChart
chartVersion: 1.0.1
```
1. Remove the unused chart archive for version 1.0.0 from the `manifests` directory:
```
rm slackernews-1.0.0.tgz
```
1. From the `manifests` directory, lint the release manifests:
```bash
replicated release lint --yaml-dir .
```
:::note
If you see a `helm-archive-missing` error, confirm that you have only one chart archive in `manifests` for version 1.0.1, and that the `chartVersion` in the HelmChart resource is also set to `1.0.1`. If you notice that any of the errors are from files in your `.history/` directory, run `rm -rf .history` and then lint the files again.
:::
1. Create and promote a new release, setting the version label of the release to `0.0.2`:
```bash
replicated release create --yaml-dir . --promote Unstable --version 0.0.2
```
**Example output**:
```bash
• Reading manifests from . ✓
• Creating Release ✓
• SEQUENCE: 2
• Promoting ✓
• Channel 2kvjwEj4uBaCMoTigW5xty1iiw6 successfully set to release 2
```
1. On your VM, update the application instance to the new version that you just promoted:
1. In the Admin Console, go to the **Version history** tab.
The new version is displayed automatically.

[View a larger version of this image](/images/quick-start-slackernews-available-updates.png)
1. Click **Deploy** next to the new version.
The Embedded Cluster upgrade wizard opens. Follow the steps until you see the **Preflight checks** screen.
1. On the **Preflight checks** screen, note that the "Slack Accessible" preflight check that you added was successful. Click **Next: Confirm and deploy**.

[View a larger version of this image](/images/quick-start-slackernews-preflight.png)
1. On the **Confirm and Deploy** page, click **Deploy**.
1. Clean up the installation:
* If you created the VM with CMX, delete the VM:
```bash
replicated vm rm VM_ID
```
Where VM_ID is the ID of the VM. You can run `replicated vm ls` to get the ID.
* If you brought your own VM, use Embedded Cluster to reset and reboot the VM to remove the installation:
```bash
sudo ./APP_SLUG reset
```
Where `APP_SLUG` is the unique slug for the application.
:::note
You can find the application slug by running replicated app ls on your local machine.
:::
## Next steps
Congratulations! As part of this quick start, you:
* Added the Replicated SDK to a Helm chart
* Created a release with the Helm chart
* Installed the release on a VM with Embedded Cluster
* Viewed telemetry for the installed instance in the Vendor Portal
* Created a new release to add preflight checks to the application
* Updated the application to the new version using Embedded Cluster
Now that you are familiar with the workflow of creating, installing, and updating releases, you can begin onboarding your own application to the Replicated Platform.
To get started, see [Onboard to the Replicated Platform](replicated-onboarding).
## Related topics
For more information about the Replicated Platform features mentioned in this quick start, see:
* [Embedded Cluster Overview](/vendor/embedded-overview)
* [About CMX](/vendor/testing-about)
* [About Preflight Checks and Support Bundles](/vendor/preflight-support-bundle-about)
* [About the Replicated SDK](/vendor/replicated-sdk-overview)
* [Manage Releases with the CLI](/vendor/releases-creating-cli)
* [Package a Helm Chart for a Release](/vendor/helm-install-release)
[View a larger version of this image](/images/embedded-cluster-install-dialog-latest.png)
1. When prompted by the `install` command, set a password for accessing the Admin Console.
:::note
Remember this password because you will use it to log in to the Admin Console in a later step.
:::
The installation command takes a few minutes to complete.
**Example output:**
```bash
? Set the Admin Console password (minimum 6 characters): ********
? Confirm the Admin Console password: ********
✔ Initialization complete
✔ Host preflights passed
✔ Node is ready
✔ Storage is ready
✔ Runtime Operator is ready
✔ Admin Console is ready
✔ Additional components are ready
-----------------------------------------------------------------
Visit the Admin Console to configure and install slackernews-gnu:
http://10.0.0.11:30000
-----------------------------------------------------------------
```
At this point, the cluster is provisioned and the Admin Console is deployed, but the application is not yet installed.
1. Do one of the following to access the Admin Console:
* If you brought your own VM, go to the URL provided in the output of the install command.
:::note
The IP address in the provided URL might be the private IP address of your VM. You might need to edit the URL to use the public IP address.
:::
* If you created the VM with CMX:
1. In the Vendor Portal, go to [**Compatibility Matrix**](https://vendor.replicated.com/compatibility-matrix/overview).
1. Open the dot menu for your VM and click **Edit VM**.

[View a larger version of this image](/images/compatibility-matrix-edit-vm.png)
1. Under **Ingress & Ports**, for **Add DNS record**, click **Add** to create a DNS record using the default settings. This will provide a hostname where you can access the Admin Console.
1. Add another DNS record with a **Target Port** of **443**. This will provide a hostname where you can access SlackerNews after it's installed.
The following shows an example of both of these DNS records added to a VM:

[View a larger version of this image](/images/compatibility-matrix-dns-record.png)
1. (Optional) Copy the URL for the DNS record with a target port of 443 and save it somewhere on your local machine. You will be asked to provide this hostname in the Admin Console as part of the installation process for SlackerNews.
1. In a browser, navigate to the URL for the DNS record with a target port of 30000.
The Admin Console opens.
1. If you are directed to the Admin Console landing page:
1. Click **Start**.
1. On the **Secure the Admin Console** screen, review the instructions and click **Continue**. In your browser, follow the instructions that were provided on the **Secure the Admin Console** screen to bypass the warning.
1. On the **Certificate type** screen, either select **Self-signed** to continue using the self-signed Admin Console certificate or click **Upload your own** to upload your own private key and certificate. By default, a self-signed TLS certificate is used to secure communication between your browser and the Admin Console. You will see a warning in your browser every time you access the Admin Console unless you upload your own certificate.
:::note
If you created the VM with CMX, you might not see these pages. Instead, your browser might automatically redirect to the Admin Console login screen.
:::
1. On the login screen, enter the Admin Console password that you set and click **Log in**.

[View a larger version of this image](/images/quick-start-slackernews-admin-console-login.png)
1. On the **Configure the cluster** screen, you can view details about the VM where you installed, including its node role, status, CPU, and memory. Users can also optionally add additional nodes on this page before deploying the application. Click **Continue**.

[View a larger version of this image](/images/quick-start-slackernews-configure-the-cluster.png)
1. On the **Configure SlackerNews** screen, complete the following fields:
* For **Ingress Hostname**:
* If you created the VM with CMX, enter the URL that you copied for the DNS record with a target port of 443. For example, `pensive-keldysh.ingress.replicatedcluster.com`.
* If you are using your own VM, provide the public IP address for your VM. You can copy the IP address from your browser's address bar where you are currently accessing the Admin Console. Alternatively, if you have a hostname for your VM's IP address, you can provide that instead.
* For **Application Access > Service Type**, ensure that **NodePort** is selected. Leave the **Node Port** field blank to use the default port of 443.
* For **Postgresql**, ensure that **Deploy Postgresql Database** is enabled to deploy the built-in Postgresql database.
Leave the other fields on the **Configure SlackerNews** screen empty. They are not applicable for this quick start.

[View a larger version of this image](/images/quick-start-slackernews-configure-slackernews.png)
1. Click **Continue**.
The Admin Console dashboard opens. The application status changes from Missing to Unavailable while the application is being deployed. You can click **Details** next to the status for more information about the status of specific application resources.
After a few minutes, the status changes to Ready when the application is deployed:

[View a larger version of this image](/images/quick-start-slackernews-adm-dashboard-ready.png)
1. After a few minutes when the application status is Ready, click **Open SlackerNews** to view SlackerNews in a browser.

[View a larger version of this image](/images/slackernews-landing-page.png)
1. View telemetry for the instance that you just deployed:
1. Return to the Vendor Portal, select the SlackerNews application, and go to **Customers**. Under the name of the customer, confirm that you can see an active instance.

[View a larger version of this image](/images/quick-start-slackernews-customer-instance.png)
This instance telemetry is automatically collected and sent back to the Vendor Portal by Embedded Cluster and the Replicated SDK. For more information, see [About Instance and Event Data](/vendor/instance-insights-event-data).
1. (Optional) Under **Instance ID**, click on the ID to view additional insights including the versions of Kubernetes and the Replicated SDK running in the cluster where you installed the application.
1. Create a new release that adds preflight checks to the application:
1. In your local filesystem, go to the `quick-start/chart/slackernews` directory.
1. Create a `preflights.yaml` file in the `templates` directory for the chart:
```
touch templates/preflights.yaml
```
1. In the `preflights.yaml` file, add the following YAML to create a Kubernetes Secret with a simple preflight spec:
```yaml
apiVersion: v1
kind: Secret
metadata:
name: slackernews-preflight
labels:
troubleshoot.sh/kind: preflight
stringData:
preflight.yaml: |-
apiVersion: troubleshoot.sh/v1beta2
kind: Preflight
metadata:
name: slackernews-preflight
spec:
collectors:
- clusterInfo: {}
- clusterResources: {}
- http:
collectorName: slack
get:
url: https://api.slack.com/methods/api.test
timeout: 20s
analyzers:
# verify that slack is accessible
- textAnalyze:
checkName: Slack Accessible
fileName: slack.json
regex: '"status": 200,'
outcomes:
- pass:
when: "true"
message: "Can access the Slack API"
- fail:
when: "false"
message: "Cannot access the Slack API. Check that the server can reach the internet and check [status.slack.com](https://status.slack.com)."
```
The YAML above defines a preflight check that confirms that an HTTP request to the Slack API at `https://api.slack.com/methods/api.test` made from the cluster returns a successful response of `"status": 200,`.
1. In the `Chart.yaml` file, increment the version to 1.0.1:
```yaml
# Chart.yaml
version: 1.0.1
```
1. Update dependencies and package the chart to a `.tgz` chart archive:
```bash
helm package --dependency-update .
```
1. Move the `slackernews-1.0.1.tgz` chart archive to the `manifests` directory:
```bash
mv slackernews-1.0.1.tgz ../../manifests
```
1. Change to the `manifests` directory.
1. In the `manifests` directory, open the HelmChart custom resource (`slackernews.yaml`) and update the `chartVersion` to match the new archive:
```yaml
# slackernews.yaml HelmChart
chartVersion: 1.0.1
```
1. Remove the unused chart archive for version 1.0.0 from the `manifests` directory:
```
rm slackernews-1.0.0.tgz
```
1. From the `manifests` directory, lint the release manifests:
```bash
replicated release lint --yaml-dir .
```
:::note
If you see a `helm-archive-missing` error, confirm that you have only one chart archive in `manifests` for version 1.0.1, and that the `chartVersion` in the HelmChart resource is also set to `1.0.1`. If you notice that any of the errors are from files in your `.history/` directory, run `rm -rf .history` and then lint the files again.
:::
1. Create and promote a new release, setting the version label of the release to `0.0.2`:
```bash
replicated release create --yaml-dir . --promote Unstable --version 0.0.2
```
**Example output**:
```bash
• Reading manifests from . ✓
• Creating Release ✓
• SEQUENCE: 2
• Promoting ✓
• Channel 2kvjwEj4uBaCMoTigW5xty1iiw6 successfully set to release 2
```
1. On your VM, update the application instance to the new version that you just promoted:
1. In the Admin Console, go to the **Version history** tab.
The new version is displayed automatically.

[View a larger version of this image](/images/quick-start-slackernews-available-updates.png)
1. Click **Deploy** next to the new version.
The Embedded Cluster upgrade wizard opens. Follow the steps until you see the **Preflight checks** screen.
1. On the **Preflight checks** screen, note that the "Slack Accessible" preflight check that you added was successful. Click **Next: Confirm and deploy**.

[View a larger version of this image](/images/quick-start-slackernews-preflight.png)
1. On the **Confirm and Deploy** page, click **Deploy**.
1. Clean up the installation:
* If you created the VM with CMX, delete the VM:
```bash
replicated vm rm VM_ID
```
Where VM_ID is the ID of the VM. You can run `replicated vm ls` to get the ID.
* If you brought your own VM, use Embedded Cluster to reset and reboot the VM to remove the installation:
```bash
sudo ./APP_SLUG reset
```
Where `APP_SLUG` is the unique slug for the application.
:::note
You can find the application slug by running replicated app ls on your local machine.
:::
## Next steps
Congratulations! As part of this quick start, you:
* Added the Replicated SDK to a Helm chart
* Created a release with the Helm chart
* Installed the release on a VM with Embedded Cluster
* Viewed telemetry for the installed instance in the Vendor Portal
* Created a new release to add preflight checks to the application
* Updated the application to the new version using Embedded Cluster
Now that you are familiar with the workflow of creating, installing, and updating releases, you can begin onboarding your own application to the Replicated Platform.
To get started, see [Onboard to the Replicated Platform](replicated-onboarding).
## Related topics
For more information about the Replicated Platform features mentioned in this quick start, see:
* [Embedded Cluster Overview](/vendor/embedded-overview)
* [About CMX](/vendor/testing-about)
* [About Preflight Checks and Support Bundles](/vendor/preflight-support-bundle-about)
* [About the Replicated SDK](/vendor/replicated-sdk-overview)
* [Manage Releases with the CLI](/vendor/releases-creating-cli)
* [Package a Helm Chart for a Release](/vendor/helm-install-release)