# Perform updates in kURL clusters
:::note
Replicated kURL is available only for existing customers. If you are not an existing kURL user, use Replicated Embedded Cluster instead. For more information, see [Use Embedded Cluster](/vendor/embedded-overview).
kURL is a Generally Available (GA) product for existing customers. For more information about the Replicated product lifecycle phases, see [Support Lifecycle Policy](/vendor/policies-support-lifecycle).
:::
This topic describes how to perform updates in Replicated kURL installations. It includes procedures for updating an application, as well as for updating the versions of Kubernetes, Replicated KOTS, and add-ons in a kURL cluster.
For more information about managing nodes in kURL clusters, including how to safely reset, reboot, and remove nodes when performing maintenance tasks, see [Manage Nodes](https://kurl.sh/docs/install-with-kurl/managing-nodes) in the open source kURL documentation.
## Update an application
For kURL installations, you can update an application from the Admin Console. You can also set up automatic updates. See [Configure Automatic Updates](/enterprise/updating-apps).
### Online environments
To perform an update from the Admin Console:
1. In the Admin Console, go to the **Version History** tab.
1. Click **Check for updates**.
A new upstream version displays in the list of available versions.
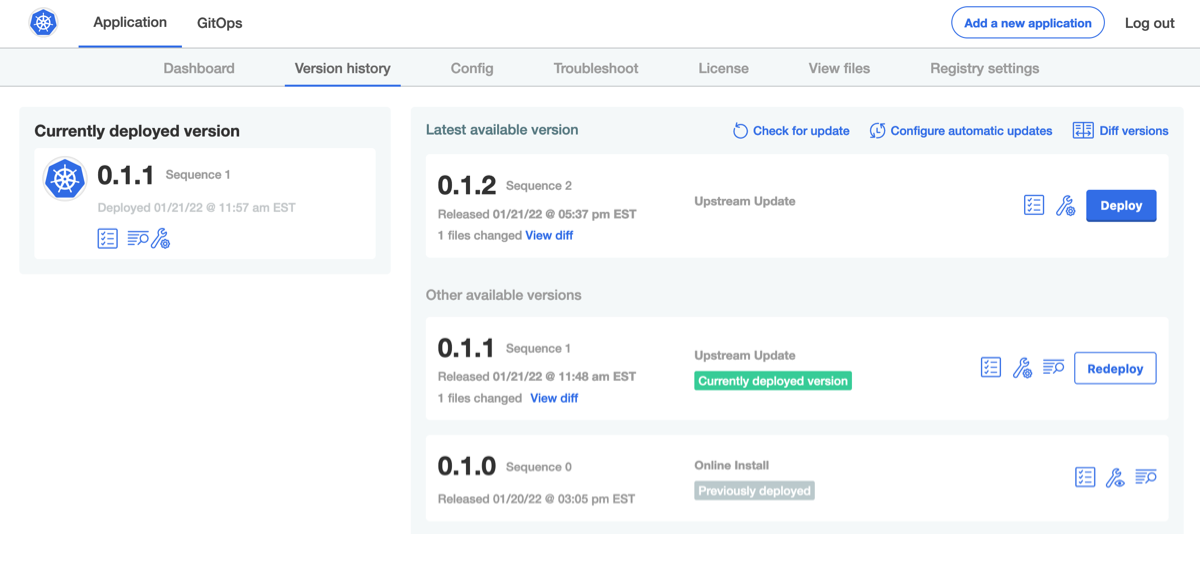 [View a larger version of this image](/images/new-version-available.png)
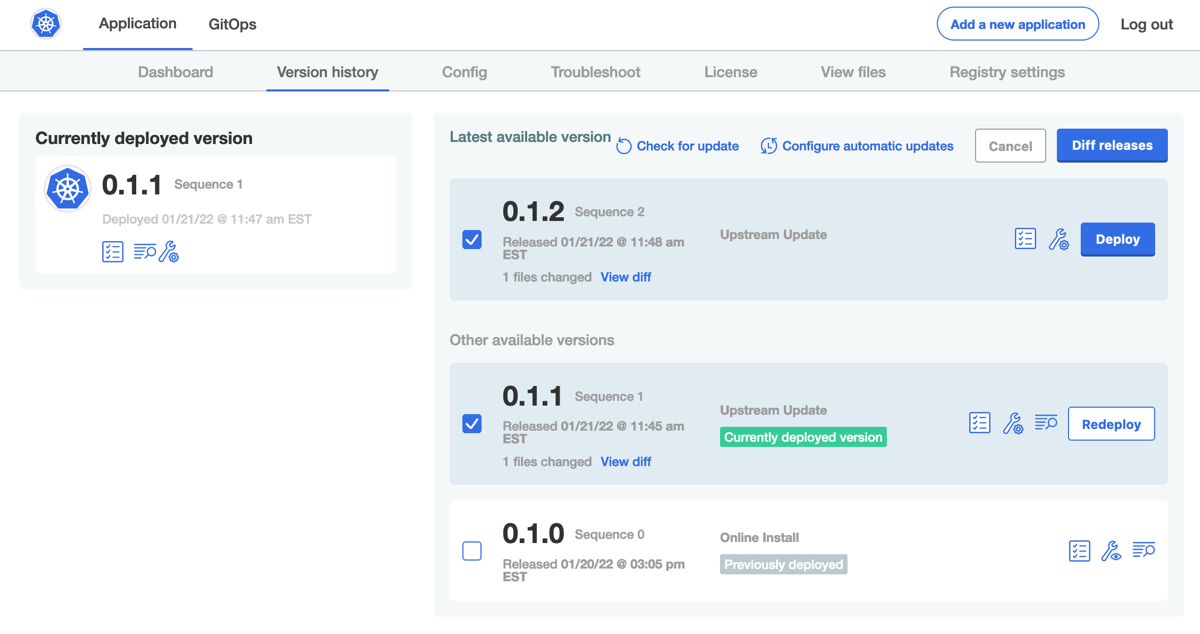
1. (Optional) When there are multiple versions of an application, you can compare
the changes between them by clicking **Diff releases** in the right corner.
You can review changes between any two arbitrary releases by clicking the icon in the header
of the release column. Select the two versions to compare, and click **Diff releases**
to show the relative changes between the two releases.
[View a larger version of this image](/images/new-version-available.png)
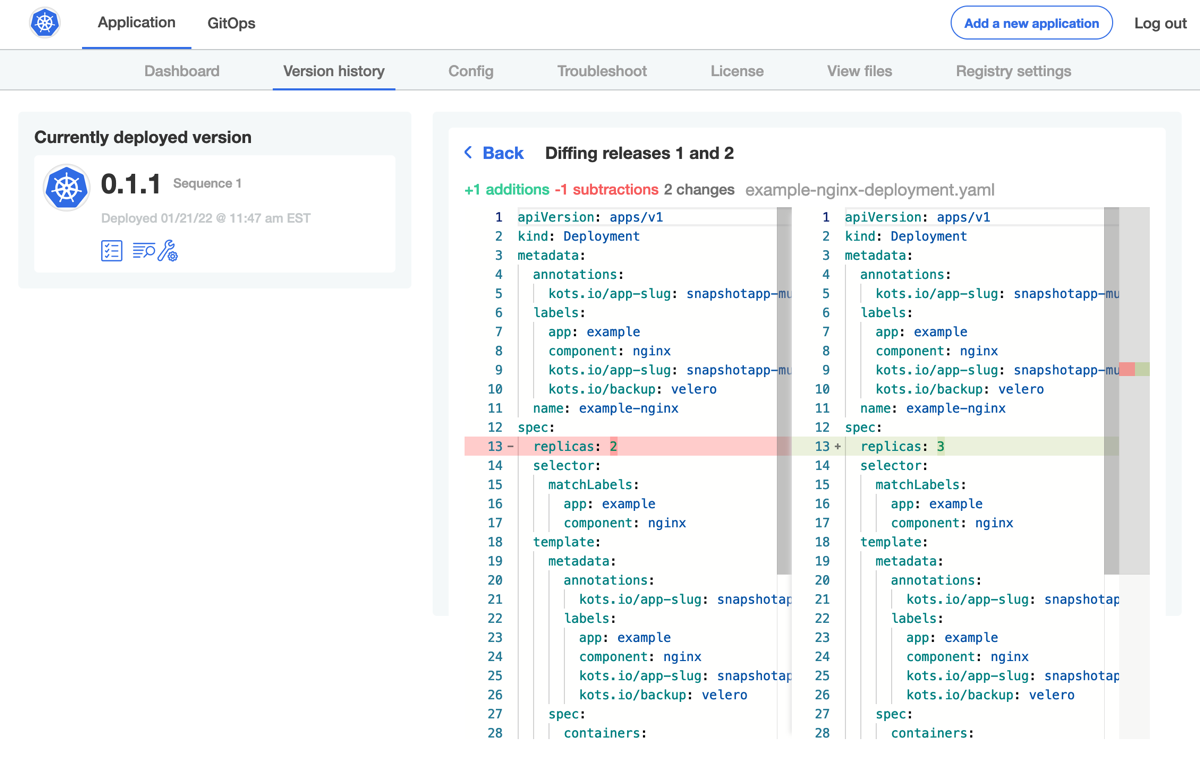
1. (Optional) When there are multiple versions of an application, you can compare
the changes between them by clicking **Diff releases** in the right corner.
You can review changes between any two arbitrary releases by clicking the icon in the header
of the release column. Select the two versions to compare, and click **Diff releases**
to show the relative changes between the two releases.
 [View a larger version of this image](/images/diff-releases.png)
 [View a larger version of this image](/images/new-changes.png)
1. (Optional) Click the **View preflight checks** icon to view or re-run the preflight checks.
[View a larger version of this image](/images/new-changes.png)
1. (Optional) Click the **View preflight checks** icon to view or re-run the preflight checks.
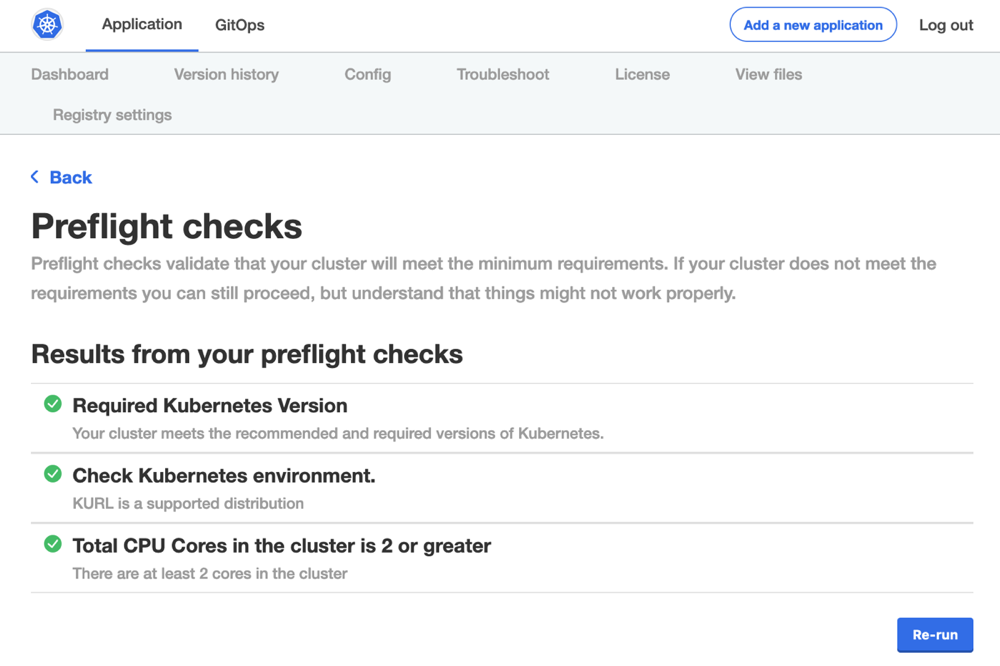 [View a larger version of this image](/images/preflight-checks.png)
1. Return to the **Version History** tab and click **Deploy** next to the target version.
### Air gap environments
import BuildAirGapBundle from "../install/_airgap-bundle-build.mdx"
import DownloadAirGapBundle from "../install/_airgap-bundle-download.mdx"
import ViewAirGapBundle from "../install/_airgap-bundle-view-contents.mdx"
To perform an air gap update from the Admin Console:
1. In the [Vendor Portal](https://vendor.replicated.com), go the channel where the target release is promoted to build and download the new `.airgap` bundle:
1.
1.
1. In the Admin Console, go to the **Version History** tab.
1. Click **Upload a new version**.
A new upstream version displays in the list of available versions.

1. (Optional) When there are multiple versions of an application, you can compare
the changes between them by clicking **Diff releases** in the right corner.
You can review changes between any two arbitrary releases by clicking the icon in the header
of the release column. Select the two versions to compare, and click **Diff releases**
to show the relative changes between the two releases.


1. (Optional) Click the **View preflight checks** icon to view or re-run the preflight checks.

1. Return to the **Version History** tab and click **Deploy** next to the target version.
## Update the kURL cluster
After updating the kURL installer spec, you can rerun the kURL installation script to update a kURL cluster. For more information about kURL cluster udpates, see [About kURL Cluster Updates](/enterprise/updating-kurl-about).
For more information about managing nodes in kURL clusters, including how to safely reset, reboot, and remove nodes when performing maintenance tasks, see [Manage Nodes](https://kurl.sh/docs/install-with-kurl/managing-nodes) in the open source kURL documentation.
:::important
The Kubernetes scheduler automatically reschedules Pods to other nodes during maintenance. Any deployments or StatefulSets with a single replica experience downtime while being rescheduled.
:::
### Online environments
To update the kURL cluster in an online environment:
1. Edit the kURL installer spec as desired. For example, update the version of Kubernetes or add, remove, or update add-ons. For more information, see [Create a kURL Installer](/vendor/packaging-embedded-kubernetes).
1. Run the kURL installation script on any primary node in the cluster:
```bash
curl -sSL https://k8s.kurl.sh/APP_SLUG | sudo bash -s ADVANCED_OPTIONS
```
Replace:
* `APP_SLUG` with the unique slug for the application.
* `ADVANCED_OPTIONS` optionally with any flags listed in [Advanced Options](https://kurl.sh/docs/install-with-kurl/advanced-options) in the kURL documentation.
To use no advanced installation options, remove `-s ADVANCED_OPTIONS` from the command.
See the following recommendations for advanced options:
* **installer-spec-file**: If you used the `installer-spec-file` flag to pass a `patch.yaml` file when you installed, you must pass the same `patch.yaml` file when you upgrade. This prevents the installer from overwriting any configuration from your `patch.yaml` file and making changes to the add-ons in your cluster. For example: `installer-spec-file="./patch.yaml"`.
* **app-version-label**: By default, the script also upgrades your application to the latest version when you run the installation script.
You can specify a target application version with the `app-version-label` flag. To avoid upgrading your application version, set the `app-version-label` flag to the currently installed application version. For example: `app-version-label=1.5.0`.
1.
### Air gap environments
For air gap installations, you must load images on each node in the cluster before you can run the installation script to update Kubernetes and any add-ons. This is because upgraded components might have Pods scheduled on any node in the cluster.
To update the kURL cluster in an air gap environment:
1. Edit the kURL installer spec as desired. For example, update the version of Kubernetes or add, remove, or update add-ons. For more information, see [Create a kURL Installer](/vendor/packaging-embedded-kubernetes).
1. Repeat the following steps on each node in the cluster to download and extract the kURL `.tar.gz` air gap bundle for the updated spec:
1. Download the kURL `.tar.gz` air gap bundle from the channel where the new kURL installer spec is promoted:
* To download the kURL air gap bundle for the Stable channel:
```bash
export REPLICATED_APP=APP_SLUG
curl -LS https://k8s.kurl.sh/bundle/$REPLICATED_APP.tar.gz -o $REPLICATED_APP.tar.gz
```
Where `APP_SLUG` is the unqiue slug for the application.
* To download the kURL bundle for channels other than Stable:
```bash
replicated channel inspect CHANNEL
```
Replace `CHANNEL` with the exact name of the target channel, which can include uppercase letters or special characters, such as `Unstable` or `my-custom-channel`.
In the output of this command, copy the curl command with the air gap URL.
1. Extract the contents of the bundle:
```bash
tar -xvzf FILENAME.tar.gz
```
Replace `FILENAME` with the name of the downloaded kURL `.tar.gz` air gap bundle.
1. Run the following KURL script to ensure all required images are available:
```bash
cat tasks.sh | sudo bash -s load-images
```
:::note
The kURL installation script that you will run in the next step also performs a check for required images and prompts you to run the `load-images` command if any images are missing.
:::
1. Run the kURL installation script on any primary node in the cluster with the `airgap` option:
```bash
cat install.sh | sudo bash -s airgap OTHER_ADVANCED_OPTIONS
```
Replace `OTHER_ADVANCED_OPTIONS` optionally with any flags listed in [Advanced Options](https://kurl.sh/docs/install-with-kurl/advanced-options) in the kURL documentation.
See the following recommendations for advanced options:
* **installer-spec-file**: If you used the `installer-spec-file` flag to pass a `patch.yaml` file when you installed, you must pass the same `patch.yaml` file when you upgrade. This prevents the installer from overwriting any configuration from your `patch.yaml` file and making changes to the add-ons in your cluster. For example: `installer-spec-file="./patch.yaml"`.
* **app-version-label**: By default, the script also upgrades your application to the latest version when you run the installation script.
You can specify a target application version with the `app-version-label` flag. To avoid upgrading your application version, set the `app-version-label` flag to the currently installed application version. For example: `app-version-label=1.5.0`.
1.
:::note
If Kubernetes must be upgraded by more than one minor version, the script automatically searches for the required Kubernetes assets in the `/var/lib/kurl/assets/` directory. If the assets are not available, the script prints a command to download the assets as a `tar.gz` package. Download and provide the absolute path to the package when prompted to continue with the upgrade.
:::
[View a larger version of this image](/images/preflight-checks.png)
1. Return to the **Version History** tab and click **Deploy** next to the target version.
### Air gap environments
import BuildAirGapBundle from "../install/_airgap-bundle-build.mdx"
import DownloadAirGapBundle from "../install/_airgap-bundle-download.mdx"
import ViewAirGapBundle from "../install/_airgap-bundle-view-contents.mdx"
To perform an air gap update from the Admin Console:
1. In the [Vendor Portal](https://vendor.replicated.com), go the channel where the target release is promoted to build and download the new `.airgap` bundle:
1.
1.
1. In the Admin Console, go to the **Version History** tab.
1. Click **Upload a new version**.
A new upstream version displays in the list of available versions.

1. (Optional) When there are multiple versions of an application, you can compare
the changes between them by clicking **Diff releases** in the right corner.
You can review changes between any two arbitrary releases by clicking the icon in the header
of the release column. Select the two versions to compare, and click **Diff releases**
to show the relative changes between the two releases.


1. (Optional) Click the **View preflight checks** icon to view or re-run the preflight checks.

1. Return to the **Version History** tab and click **Deploy** next to the target version.
## Update the kURL cluster
After updating the kURL installer spec, you can rerun the kURL installation script to update a kURL cluster. For more information about kURL cluster udpates, see [About kURL Cluster Updates](/enterprise/updating-kurl-about).
For more information about managing nodes in kURL clusters, including how to safely reset, reboot, and remove nodes when performing maintenance tasks, see [Manage Nodes](https://kurl.sh/docs/install-with-kurl/managing-nodes) in the open source kURL documentation.
:::important
The Kubernetes scheduler automatically reschedules Pods to other nodes during maintenance. Any deployments or StatefulSets with a single replica experience downtime while being rescheduled.
:::
### Online environments
To update the kURL cluster in an online environment:
1. Edit the kURL installer spec as desired. For example, update the version of Kubernetes or add, remove, or update add-ons. For more information, see [Create a kURL Installer](/vendor/packaging-embedded-kubernetes).
1. Run the kURL installation script on any primary node in the cluster:
```bash
curl -sSL https://k8s.kurl.sh/APP_SLUG | sudo bash -s ADVANCED_OPTIONS
```
Replace:
* `APP_SLUG` with the unique slug for the application.
* `ADVANCED_OPTIONS` optionally with any flags listed in [Advanced Options](https://kurl.sh/docs/install-with-kurl/advanced-options) in the kURL documentation.
To use no advanced installation options, remove `-s ADVANCED_OPTIONS` from the command.
See the following recommendations for advanced options:
* **installer-spec-file**: If you used the `installer-spec-file` flag to pass a `patch.yaml` file when you installed, you must pass the same `patch.yaml` file when you upgrade. This prevents the installer from overwriting any configuration from your `patch.yaml` file and making changes to the add-ons in your cluster. For example: `installer-spec-file="./patch.yaml"`.
* **app-version-label**: By default, the script also upgrades your application to the latest version when you run the installation script.
You can specify a target application version with the `app-version-label` flag. To avoid upgrading your application version, set the `app-version-label` flag to the currently installed application version. For example: `app-version-label=1.5.0`.
1.
### Air gap environments
For air gap installations, you must load images on each node in the cluster before you can run the installation script to update Kubernetes and any add-ons. This is because upgraded components might have Pods scheduled on any node in the cluster.
To update the kURL cluster in an air gap environment:
1. Edit the kURL installer spec as desired. For example, update the version of Kubernetes or add, remove, or update add-ons. For more information, see [Create a kURL Installer](/vendor/packaging-embedded-kubernetes).
1. Repeat the following steps on each node in the cluster to download and extract the kURL `.tar.gz` air gap bundle for the updated spec:
1. Download the kURL `.tar.gz` air gap bundle from the channel where the new kURL installer spec is promoted:
* To download the kURL air gap bundle for the Stable channel:
```bash
export REPLICATED_APP=APP_SLUG
curl -LS https://k8s.kurl.sh/bundle/$REPLICATED_APP.tar.gz -o $REPLICATED_APP.tar.gz
```
Where `APP_SLUG` is the unqiue slug for the application.
* To download the kURL bundle for channels other than Stable:
```bash
replicated channel inspect CHANNEL
```
Replace `CHANNEL` with the exact name of the target channel, which can include uppercase letters or special characters, such as `Unstable` or `my-custom-channel`.
In the output of this command, copy the curl command with the air gap URL.
1. Extract the contents of the bundle:
```bash
tar -xvzf FILENAME.tar.gz
```
Replace `FILENAME` with the name of the downloaded kURL `.tar.gz` air gap bundle.
1. Run the following KURL script to ensure all required images are available:
```bash
cat tasks.sh | sudo bash -s load-images
```
:::note
The kURL installation script that you will run in the next step also performs a check for required images and prompts you to run the `load-images` command if any images are missing.
:::
1. Run the kURL installation script on any primary node in the cluster with the `airgap` option:
```bash
cat install.sh | sudo bash -s airgap OTHER_ADVANCED_OPTIONS
```
Replace `OTHER_ADVANCED_OPTIONS` optionally with any flags listed in [Advanced Options](https://kurl.sh/docs/install-with-kurl/advanced-options) in the kURL documentation.
See the following recommendations for advanced options:
* **installer-spec-file**: If you used the `installer-spec-file` flag to pass a `patch.yaml` file when you installed, you must pass the same `patch.yaml` file when you upgrade. This prevents the installer from overwriting any configuration from your `patch.yaml` file and making changes to the add-ons in your cluster. For example: `installer-spec-file="./patch.yaml"`.
* **app-version-label**: By default, the script also upgrades your application to the latest version when you run the installation script.
You can specify a target application version with the `app-version-label` flag. To avoid upgrading your application version, set the `app-version-label` flag to the currently installed application version. For example: `app-version-label=1.5.0`.
1.
:::note
If Kubernetes must be upgraded by more than one minor version, the script automatically searches for the required Kubernetes assets in the `/var/lib/kurl/assets/` directory. If the assets are not available, the script prints a command to download the assets as a `tar.gz` package. Download and provide the absolute path to the package when prompted to continue with the upgrade.
:::